E26 | Mudroom Cubbies | Ask This Old House
Season 23 Episode 26 | 23m 12sVideo has Closed Captions
Kevin, Tom, and Mauro build and paint mudroom cubbies; Jenn explains how to choose mulch.
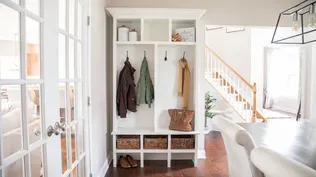
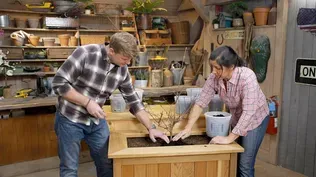
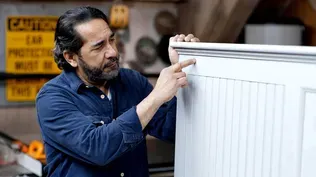
Tom Silva and Kevin O'Connor build mudroom cubbies with three main compartments for hanging coats, upper shelves for accessories, and bottom cubbies for storing shoes; Jenn Nawada goes over different types of mulch and how they can enhance a garden's health and aesthetic; Mauro Henrique and Kevin paint the mudroom cubbies that Tom and Kevin previously built using a paint sprayer.
Problems with Closed Captions? Closed Captioning Feedback
Problems with Closed Captions? Closed Captioning Feedback
Funding for THIS OLD HOUSE is provided by The Home Depot and Renewal By Andersen.
Support provided by:

E26 | Mudroom Cubbies | Ask This Old House
Season 23 Episode 26 | 23m 12sVideo has Closed Captions
Tom Silva and Kevin O'Connor build mudroom cubbies with three main compartments for hanging coats, upper shelves for accessories, and bottom cubbies for storing shoes; Jenn Nawada goes over different types of mulch and how they can enhance a garden's health and aesthetic; Mauro Henrique and Kevin paint the mudroom cubbies that Tom and Kevin previously built using a paint sprayer.
Problems with Closed Captions? Closed Captioning Feedback
How to Watch Ask This Old House
Ask This Old House is available to stream on pbs.org and the free PBS App, available on iPhone, Apple TV, Android TV, Android smartphones, Amazon Fire TV, Amazon Fire Tablet, Roku, Samsung Smart TV, and Vizio.
Keep Exploring


This Old House Insider Newsletter
Get This Old House exclusive stories, tips, and behind-the-scenes information delivered right to your inbox every month.Providing Support for PBS.org
Learn Moreabout PBS online sponsorship♪ Kevin: On "Ask This Old House," Our experts travel across the country to answer questions about your house.
♪ Today, Tommy shows you how to build mudroom cubbies.
Then Mauro gives a few tips on painting the cubbies.
Mauro: At the front, you have the nuzzle that you can flip it and you can go vertical or horizontal.
Kevin: And Jenn talks mulch -- how to calculate the right amount and the different varieties available.
What the heck is this?
On "Ask This Old House."
♪ Kevin: Hey, Tommy.
Tom: Hey, Kevin.
How are ya?
Kevin: Doing all right.
What are we looking at today?
Tom: Building some cubbies.
Kevin: Oh, yeah.
Tom: And we built one a while back, but it had a back on it-- Kevin: And a bench, right?
Tom: Yeah.
Kevin: So it was more sort of like the sit-at with a spot for your shoes underneath, hooks up top.
Tom: Right.
Kevin: This is more sort of like the locker design.
Tom: Yeah, there'll be three individual sections made of 3/4-inch plywood with openings on the bottom for two baskets and two baskets at the top of each.
Kevin: Interesting.
So you said individually?
So each one is going to be separate and then you're going to put them together?
Tom: Yeah.
It's a big cabinet.
And so you've got to move it in there wherever it's going to go.
Kevin: Yeah.
Tom: Also we have to be able to get it downstairs.
Kevin: True.
Tom: So we're going to put it together with these cap screws right here.
And it's basically... you unscrew them.
There's a cap screw and a bolt.
You just drill a hole and you screw those together and basically make them nice and tight.
And all you have is a finished screw on each side, nothing sticking out.
Kevin: I like it.
And then obviously your hooks, you've got a row of them up top here.
Tom: Right, we'll put a wide board across the back and place our hooks in there.
Kevin: Very nice.
Tom: On the outside, we'll also do a piece of 3/4 also.
So each side, each center section, will be inch and a half thick.
And to hide that, we'll use some solid wood and make the stiles and rails.
And when it's painted, it will look great.
Kevin: Love it.
Did you rip your sides to width already?
Tom: Well, the nice thing is I went to the home center and I said what I needed, a bunch of pieces.
I need them rough cut to about 16 inches.
He cut all the sheets up for me.
We still have to fine-tune everything to give it to the size -- exact size that we want.
Kevin: Yeah, that's nice actually, 'cause if you had to go in and get that four-by-eight sheet of plywood times 2 or 3, carrying it out of there could be troublesome for you.
Tom: Getting it onto the truck and then also getting it up here is tough.
Kevin: All right.
Tom: All right.
So now we'll cut our length.
Kevin: So you're going to cut a bunch at the same time.
Tom: Yeah, I'm going to stack them up.
And I'm going to cut these three right here.
But I have four pieces.
And we're going to score the bottom of that.
So what I want to do is I want to mark my length of 80 inches.
And I always like to make a little check mark like that.
So I always put my straight edge on the point.
Now you ask me what the point is.
Hmm... Kevin: [ Chuckles ] Tom: Now I put the straight edge on that.
Take my square.
All right.
So now that's the first and the last time that I have to measure... Kevin: I'll take those.
Tom: ...for the height of the sides, because I've cut three.
Now, I actually have a mark right here, so I make the other end even.
I use this as a reference, that'll make the rest of the sides all the exact same length.
Kevin: That's nice.
Tom: All right, that's our sides.
Now we can cut all of the lengths for our shelves, which will be 23 and 3/8.
All right, we have all our pieces cut to length.
Now, all I need to do is true them up width-wise on the table saw.
Now that we have all of our pieces cut, we have to start thinking about how we're going to install the shelves and attach them to the sides.
And I decided to use dados.
The shelves that are in the middle and the seat on the bottom are going to be two pieces of 3/4-inch plywood.
So they're going to go into an inch and a half Dado.
And at the top right there, it's only going to be 3/4 of an inch, single piece.
And the bottom is a 3/4-inch dado.
Kevin: Okay.
Tom: All right.
So now we want to make sure that all of the dados line up with all of the sides exactly right.
Kevin: So is this essentially now your template to set your dados for all the other boards.
Tom: Right, this is my guide for every shelf, every board.
To do that, we clamp the boards together.
And to cut the dados, I made a jig.
And that's basically an adjustable piece.
And it's set to the width of the double in this case.
Kevin: Mm.
Tom: Goes right on there just like that.
Kevin: Oh, so it actually is also holding your jig in place.
Tom: It's lining everything up exactly.
And tighten the jig up onto my pieces.
Make sure they don't move.
Once it's square, clamp it.
I'm ready to use the router.
And this is the router we're going to use with a templating bit, also known as a flush cutting bit.
And there's a bearing right here at the top of the bit.
And this is flush with the cutter.
This bearing is going to ride along the side of our templating guide.
And it's rolling right along, cutting off the piece below flush with our jig.
I just move it back and forth because I have the bit set at the depth that I want.
♪ ♪ ♪ ♪ All right, so now we're just going to change the width.
Go down to a single piece.
Bring 'em in nice and snug.
Tighten it down.
Perfect.
♪ ♪ Now I'm going to drill a series of pilot holes through each dado, 3/8 of an inch up and 3/8 of an inch down from each edge of the dado.
That will ensure that each screw goes into the center of each shelf.
While I drill the holes, why don't you sand the board flat on each side of the dado?
You don't need to sand the entire board, but it'll make it easier when we put the system together so you don't have to sand tight into the corner.
♪ ♪ Now we're ready to install the shelving.
We've pre-drilled all the holes.
We have our double pieces right there.
I'm going to use a 2-inch coarse thread screw.
Pulls it together nicely.
Kevin: You got it?
♪ ♪ ♪ ♪ Tom: All right, now, the last thing for the cubbies, we're going to put this 6-inch, 3/4-inch thick backer piece right here.
And that will be a place that we can mount our hooks to hang a jacket or a coat or whatever you want to hang.
♪ All right, now we stand it up with the three pieces together.
♪ ♪ All right, we have all our stiles and rails cut, and now we're ready to face frame the cabinet.
I'm only going to nail on this side right here into this cabinet only because I don't want to fasten it to this cabinet.
I want to be able to release this cabinet from this cabinet if we want to move it.
♪ ♪ ♪ ♪ There.
Right.
Kevin: Okay.
Tom: There you go.
Kevin: Look at that.
Tom: Looks pretty good.
Kevin: It looks really good.
Tom: Now, I think we need to convince Mauro to paint it, but I think it looks really good.
Kevin: And I presume that you want to put the hooks on after the paint is on.
Tom: Yeah, I think it would be better than cut around the hooks.
Kevin: Yeah.
So, you know, I mean, pretty simple joinery, pretty simple hardware.
But that's a really effective, good-looking piece.
Nice job, Tommy.
Tom: Well, thanks for your help.
It was a lot of fun.
♪ Kevin: Hey, Jenn.
Jenn: Hey, Kevin.
Kevin: Favorite day.
You know this my favorite day.
Jenn: Absolutely.
Mulch day.
Kevin: I love it when it goes down.
Jenn: I know.
Kevin: It makes everything look terrific.
Although it serves a purpose, too, right?
Jenn: It certainly does.
Kevin: So, on my list, uh, water retention.
Right, it helps keep the moisture in the bed.
Jenn: Yep.
Kevin: And then also weed suppression keeps those down?
Jenn: Yes.
Kevin: What am I forgetting?
Jenn: Uh, temperature control.
But then also, when you use a mulch like this, this is leaf mulch, it's an organic leaf mulch.
The leaves have been composted, turned over and over, and it's breaking down towards the soil.
So it's just going to add all those nutrients into the existing plants.
And it's a total bonus.
Kevin: Kick it up for next season.
Jenn: Yep.
Kevin: All right.
So as you're laying it down, you've got a wheelbarrow here, you've got a pile over there.
Jenn: I have a pile.
[ Chuckles ] Kevin: How did you know how big of a pile to get?
I mean, I guess what I'm really asking is how thick are you putting it down so that we can then figure out how much we have to order.
Jenn: Good question.
Because, like, something that doesn't have any mulch on it, I typically do three inches, you know, but also keep it away from the base of the tree or any plant.
But top dressing, sometimes people already have mulch on the bed, maybe do an inch, but in this case three inches.
So I would take the length times the width times the depth.
So three inches would be .25. because.
Kevin: 'Cause we're doing it in feet basically.
Jenn: Correct.
So that gets your cubic feet.
But when you call the nursery or wherever you get your delivery from, they want to know cubic yards.
So you'd take the length times the width times the depth.
Kevin: Get cubic feet... Jenn: And then you divide that by 27 to get the cubic yards.
So if a ten-by-ten foot area that's three inches deep, you're going to approximately need one yard.
Kevin: Right, and you can sort of tell the guy drop me 20 yards.
Jenn: Yep.
Kevin: Big yard.
Jenn: Yes, a lot of mulch.
Kevin: Or the bags are labeled.
Jenn: Yes, so usually they come in two cubic-feet bags.
And so if I know I have 25 cubic feet, take a ten-by-ten foot area, three inches deep.
That's 25 cubic feet, okay?
You get 12.5 bags or 13.
Kevin: Perfect Jenn: Get a little bonus.
Kevin: Okay, so you said this is organic.
Jenn: Yep.
Kevin: Smell it.
I love it right there.
Jenn: I know, it's beautiful.
Kevin: Awesome.
Although there are options.
Lots of options.
I mean, how do we decide?
Jenn: Well, I brought a bunch of samples just 'cause I knew you were going to ask me these questions.
Kevin: Oh, yeah.
Like you said, a lot of options.
Jenn: These are only some options.
Kevin: True.
Jenn: So let's start with the gravel.
A lot of people like to use this in, like, high traffic areas, you know, like parking lots and stuff where you just see so much foot traffic, or in erosion situations.
Kevin: So I think of it as sort of commercial or industrial.
Jenn: Yeah.
Kevin: We don't use it a lot here, but sometimes out west you see it a lot.
Jenn: Yep, there's a lot of landscapes that have just primarily rock.
Then you have cactus around it and succulents.
So you have to, yeah, you have to use plants that are drought tolerant 'cause this will heat up the ground.
Kevin: Although on the list of attributes this is never going to break down.
Jenn: No.
Kevin: You might have to tune it up or clean it up, but that's not going anywhere.
Jenn: Correct.
Correct.
Kevin: Okay.
And what am I looking at here?
Jenn: Well, this is rubber mulch.
Kevin: Oh my gosh.
Like shredded up tires.
Jenn: Yeah, so you can look at it from a recycled point of view, or a lot of times where you'll see it is in playgrounds.
Kevin: That's what I think, under a swing set or something.
Jenn: Yeah, and that's definitely going to not have weeds grow underneath it.
This, it heats up a lot.
I personally wouldn't use that around plants because I think it doesn't contribute anything to back to the plant or the soil.
Kevin: Right.
If you were looking for a list of attributes, maybe like the stone, this will never break down either.
And you get the black color, if you're going for that.
Jenn: Yeah, so if you have a high-traffic area that might -- might be a go-to.
Kevin: I hear you.
All right, so am I looking at color choices here?
Jenn: These are all dyed mulches.
Kevin: Red, brown, black.
Jenn: This is typically what a lot of people use and see.
These are all dyed.
I mean, this is all wood, but these are all dyed mulches.
But definitely when you're done mulching, if you're using one of these you're going to see the color on your hand.
Kevin: So in terms of effectiveness though, the three of them are working basically the same and similar to what we saw back there, three inches or so.
Jenn: Minus the organic.
Kevin: Minus the organic.
So we'll get the water retention, we'll get the weed suppression.
Jenn: Correct.
And to me, moving down this way.
Kevin: This is your corner.
Jenn: This is my corner.
So these are all organic.
This is a hemlock mulch.
Kevin: So this is not dyed.
This is all organic?
Jenn: Correct, this is just the... Kevin: It smells so good.
Jenn: ...branch is all chopped up.
It's broken down a little bit more, a little more fine.
Kevin: Yep.
So you can get color variations natural a little bit more red here versus the darker ones.
And this is... Jenn: Pine bark.
Kevin: So this is pine.
Jenn: And this is leaf mulch.
What I was using over there I mean, I really have grown to love this the most because it's breaking down.
It's going back to the soil.
You get your nutrients and it looks like soil.
Kevin: And what in the world?
This is natural?
Jenn: So these are buckwheat hulls.
Kevin: Oh!
Jenn: They're super light.
Kevin: Have you ever used it?
Jenn: I have, I've had clients ask for it in like more formal gardens and perennial gardens where you don't want a really heavy mulch.
You know, if you have all perennials, sometimes mulch, if you put too much, it could really make -- invite moisture and rot.
Kevin: Yeah.
This is super light right here.
Jenn: So a con is when it's super dry, it's just gonna blow away, right?
Kevin: And stick into your toes.
Jenn: Yes.
Yeah, it's gonna stick into your toes, but otherwise the color.
It's a nice natural option as well.
Kevin: So, if you need a little pop in a small area, go to something really unique like that.
Jenn: Yeah, something different like that.
Kevin: Very nice.
All right.
Well, I appreciate the tour, taking me through all of this.
Something tells me you might have just lured me into helping you spread.
Jenn: Yeah, I have another pitchfork, so.
Kevin: I saw that second one out there.
I was wondering who it was for.
Jenn: Thank you.
Tom: So, a couple of Allen screws you take these together... Kevin: Oh, nice job, Tommy.
You convinced them, huh?
He's persuasive, isn't he?
Mauro: One for the team.
Kevin: [ Laughs ] Tom: Yeah, I told him he got to do a little more sanding.
He can take it apart, three sections, a couple Allen screws, no problem.
And all the hooks.
Kevin: Good.
Mauro: Well, you guys did a great job.
Look at this piece.
Tom: All yours, Mauro.
Mauro: Nice.
Kevin: So I guess he's taking off, but I'm going to stick around if you need help.
Mauro: Absolutely.
Let's take that one.
Kevin: All right, we did hit the corners with sandpaper as we were putting it together.
Mauro: Okay.
So now all we have to do is send the rest of it, and we're going to use a 220 grit sandpaper.
♪ And, Kevin, time to prime this beauty here.
Kevin: Okay.
What am I using for primer?
Mauro: We're going to use this tinted primer.
It's a water-based primer.
Interior and exterior.
Kevin: And why tinted?
Mauro: Because of the color that we're going to use.
It's a deep base color.
Tinted primer, can't go wrong.
There.
Kevin: Tinted gray.
Mauro: Tinted gray.
All right, let's pour some of that.
Kevin: You got a brush handy?
Mauro: Now some over here.
Kevin: So I take it we're going to have one roll, one brush.
Mauro: Yes.
Do you want to have a preference, rolling or brushing?
Kevin: You know what?
You're a steady hand.
So I'll -- I'll be the brute force and I'll roll.
Mauro: All right.
♪ Kevin: It's okay that I'm painting over the hardware, right?
That's what you wanted?
Mauro: Yeah.
I think if we paint it, this look much better.
Kevin: So, Mauro, this is probably going to end up in a mudroom.
Hard-working piece, I can see muddy boots, wet coats dripping down here.
Have you taken that into consideration?
Mauro: Absolutely.
So we got this good primer going.
And also the paint that we're going to be using is a very tough paint -- scuff resistant.
And, you know, all the moisture resistant and everything.
Kevin: Okay.
Mauro: Well, now that the prime is dry, it's time to fill up all the no-holes.
Lightly sand, and we'll be ready to paint.
♪ Kevin: Okay, Mauro, what do you think?
Do you approve?
Mauro: I approve, looks good.
Prime is done.
Sand is done.
Clean.
Because we're going to be spraying this, I like to protect the back and the surrounding.
♪ ♪ Kevin: All right, Mauro, time for the reveal.
This color.
Lay it on me.
Mauro: Big reveal.
You want to see the color?
Kevin: If this is just another gray, I'm going to be very disappointed.
Mauro: Not another gray.
Not another off-white.
Kevin: Oh, that's not gray.
Mauro: There we go.
No, that's not gray at all.
Mauro: Right?
Kevin: What color do you call this?
Mauro: This is called Classic Burgundy.
Kevin: Beautiful.
Mauro: And we're going to be doing a semi-gloss this time.
Kevin: For extra durability, higher gloss.
Mauro: Extra durability, high gloss.
We'll use a lot of satin.
This will be a semi-gloss a little bit of sheen.
More to resist and everything for this piece that goes to a mudroom.
And then when we're going to apply this paint, we're going to use this little sprayer here.
Kevin: So not your usual professional one, huh?
This is, uh, homeowner-friendly?
Mauro: It's a homeowner-friendly.
It's a, you know, it's an electric hand-held sprayer.
At the front, you have the nozzle, um, that you can flip it, and you can go vertical or horizontal.
Kevin: Okay.
Mauro: All right?
And over here, you control the airflow.
Kevin: And then this is your basin.
This is not out of a bucket, just out of this.
Mauro: Not out of the bucket, this is like a container that holds up to one quarter paint.
Kevin: Okay.
Mauro: All right?
Kevin: Well, let's put it through its paces with some Classic Burgundy.
Mauro: Classic Burgundy.
Let's go.
Kevin: So what's your application technique?
Mauro: You overlap by 50% on each pass.
Kevin: So that looks pretty good.
So I'm watching you, Mauro, work and you're actually flipping the nozzle so that you're not actually flipping the whole gun, right?
Mauro: Absolutely.
That's one of the main reasons I cannot be flipping the container or the gun is because of the tube that's in there.
Kevin: Tube is sitting down here.
Mauro: Tube is sitting down there, and it curves down this way.
Kevin: So if you ended up turning the gun up on its side or even worked upside down, you're not going to draw paint.
Mauro: I'm not pick up any paint and no paint will come out of the tip.
Kevin: So instead of tipping the gun, just tip the nozzle.
Mauro: To tip the gun, all you have to do like right now we have the horizontal position.
If you want a vertical, all I have to do is that and I just go like this.
I don't have to be tilting the whole gun.
Kevin: Right, it helps to be in the hand of a pro, but yeah, get after it.
Mauro: Well, we need to put more paint on this.
Kevin: Oh, right.
Mauro: A little more.
That's it.
Kevin: So you can see the tube you were talking about, right?
So this is the input.
Mauro: How you got the angle up Kevin: Yeah.
That's sitting down in the bucket.
Mauro: It catches right at the bottom there.
♪ Kevin: And first coat looks really good.
Mauro: Coat is beautiful.
Looks good.
You're going to let it dry.
And then we'll come back and we'll put the second and final coat on.
Kevin: And with the second coat of paint on, we can add the hooks.
Last hook, three in each bay.
Mauro: Wow.
Kevin: Huh?
You like?
Mauro: I love it.
Look at this.
Kevin: Yeah, that's a good color, but it makes a statement.
Mauro: Hooks... Tom: Hey, looks good, guys.
Kevin: You think it pops?
Tom: Red, huh?
Kevin: Oh, no, no.
Classic Burgundy.
Tom: Oh.
Excuse me.
Mauro: Just like the wine.
Tom: I like the sheen, too.
Tom: Looks good.
Kevin: Nice job, nice job.
Mauro: It looks great, I like it.
Kevin: All right, well, that's it for us.
Until next time, I'm Kevin O'Connor.
Mauro: I'm Mauro Henrique... Tom: And I'm Tom Silva... Kevin: ...for "Ask This Old House."
Tom: Yeah.
How'd you like that spray gun?
Mauro: Oh, that spray gun is okay.
Tom: Yeah.
Looks pretty good, Mauro.
♪ ♪ ♪ ♪


Support for PBS provided by:
Funding for THIS OLD HOUSE is provided by The Home Depot and Renewal By Andersen.